HTML & CSS Overview
Most websites are built with HTML, CSS and JavaScript at least. We’ll start with HTML (content of the page) and CSS (look/ style of the page).
HTML
Hypter Text Markup Language (= no programming language)
Describes structure and elements of a Web page
A browser displays the content
Structure of an HTML document
<!DOCTYPE html>
<html>
    <head>
        <title>Writing an own website</title>
    </head>
    <body>
        <h1>Writing an own website</h1>
        <p>Text inside a paragraph.</p>
        <p>Another paragraph.</p>
    </body>
</html>
Basically a HTML document consists of two main parts: the head and the body. The head contains meta data and imports (more later), which are not visible in the view of the Web page. The content of the body contains visible elements. Both head and body, are enclosed by a html tag. Placing elements inside other elements is called nesting. Outer elements are parents of inner elements (children).
(Commonly the main/ first HTML file is called index.html.)
Tags
Elements of a website (like headlines, texts, images) are defined by tags. Content inside tags is enclosed by a start tag and an end tag (with a /):
<tag>content</tag>
Some common tags:
<h1>Heading of size 1 (big)</h1>
<h3>Heading of size 3 (middle)</h3>
<h6>Heading of size 6 (small)</h6>
<!-- Headings are relevant for search engines.
1 = important information on your Web page, 2 = less important, ... -->

<p>A paragraph of text.</p>

<img>Display an image.

<video>Use a built-in video player.</video>

<a>Set a link to an internal (anchor) or external URL.</a>

<button>Button, commonly used to execute a function.</button>

<div>
    A container for almost all other html elements.
</div>

<span>A inline container for a portion of a text.</span>

<br> <!-- A manual line break. No content, no end tag.-->
A list of all tags with links to their reference: HTML Element Reference
Attributes
Most tags have attributes to insert additional information. Attributes are specified inside the start tag. Commonly the syntax is attribute=”value”, for example href=”https://www.uni-weimar.de”.
<a href="https://www.uni-weimar.de">Link to Bauhaus University</a>
href (hypertext reference) is an attribute of the <a> tag. It defines the destination of the link. See more attributes of a link.
index.html document. Use the `target` attribute with the value `_blank`.Change the content of the other tags if you like.
CSS
CSS means Cascading Style Sheets. CSS is used to style the elements of a Web page.
Syntax
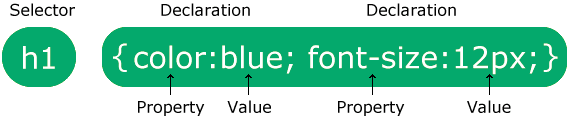
CSS assignments are done through specifying an element (selector) and declare one or more property:value-pairs:
Integration of CSS into HTML
There are 3 possible ways to insert CSS into your HTML document:
1: Inline through the style attribute of a tag, for example h1:
<h1 style="color: orange;">Orange heading</h1>
Inline style is applied only to this unique element.
2: Internal through the style tag inside the head:
<head>
    <style>
        p {
            background-color: teal;
            color: snow;
        }
    </style>
</head>
The style code above is applied to all p tags of the document.
3: External through a separate .css file. This is the common and recommended way, unless it’s a very minimal page with a small portion of CSS. (Then an internal embedding is recommended.)
External files are embedded through the head tag:
<head>
    <link rel="stylesheet" href="css/style.css">
</head>
The link tag is one of a few without an end tag.
Common folder structure of a Web project:
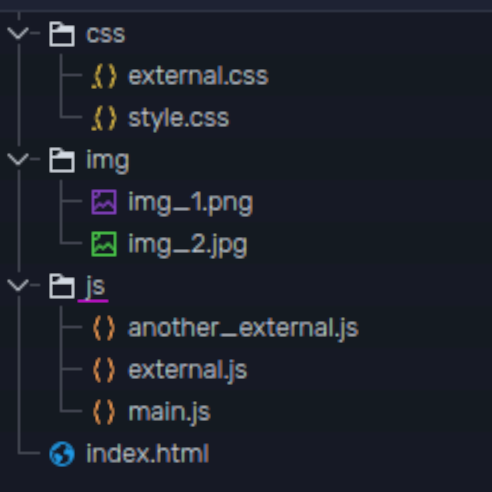
HTML files in the main folder, images/ videos/ sounds in separate subfolders, CSS files in a subfolder, JavaScript files in a subfolder.
style.css and save it inside a subfolder named css. Paste the following content into it:
h1 {
    color: orange;
}

p {
    background-color: teal;
    color: snow;
}
Of course you can/ should change the color values. Here is a list of 140 color names which are supported by modern browsers.
For more variety, you can specify a color value in the following formats:
a {
    color: black;
    background-color: rgb(111, 65, 30);
    background-color: #ffa64d;
    background-color: hsl(50, 100%, 50%);
    background-color: rgba(111, 65, 30, 0.5);
    background-color: hsla(50, 100%, 50%, 0.5);
    /* Specifying a value multiple times will override
    previous values. */
}
Cascading means that styles are inherited from parent elements.
Add the following CSS to your stylesheet. (Typically the style for the body tag is placed on top of all other elements.)
body {
    font-family: monospace;
    font-size: 16pt;
    background-color: salmon;
}
Choose a font-family or several based on this information.
It is possible to use the 3 ways of integrating CSS all together. Then some values will be overridden by others: Inline has the highest priority. The priority between internal and external styles is given through their appearance in the header: styles that appear later will override previous styles.
Selectors
We have used tags as selectors already. There are two more options: id and class. These are two attributes that we can assign to HTML-Elements.
An id is a unique identifier, thus we should avoid using the same value/ name for several id-attributes. It is useful if we want to style one specific element or even more if we want to access one specific element (with JavaScript).
We will add a button with a unique id.
<button id="info-button">info</button>
No we can style this button either by the button tag or its id. If we want to address an id in CSS, we write a # before the name.
#info-button {
    letter-spacing: 5px;
}
/* or */
button {
    letter-spacing: 5px;
}
The class selector is used if we want to group several elements, for example the 3 w’s in our headline, so that we can highlight them. For that we have to replace every w in our headline with:
<span class="www">w</span>
(For a default highlight effect, we could also use the specified tag mark.)
We define a class in CSS with a dot before the class name:
.www {
    text-decoration: underline;
}
Overview:
tag {
    /* Declarations */
}
#id {
    /* Declarations */
}
.class {
    /* Declarations */
}
Nesting
It’s possible to combine selectors to access nested elements. Example HTML:
<div>
    <img src="img/img_1.png">
</div>
<img src="img/img_2.png">
CSS:
img {
    width: 100%;
}

/* This will override the width of all <img> elements inside <div> containers. */
div img {
    width: 50%;
}
Have a look at the following links on styling text:
https://www.w3schools.com/css/css_text_align.asp
https://www.w3schools.com/css/css_text_decoration.asp
https://www.w3schools.com/css/css_text_transformation.asp
https://www.w3schools.com/css/css_text_spacing.asp
Media queries
Media queries are used to define CSS style in relation to the device (screen, print) and its size. Following the mobile-first principle we will write the CSS code for small devices first and add media queries for larger devices. This is done through the syntax @media (min-width: ).
If CSS is written desktop-first, a media query looks like @media (max-width: ).
body {
    background-color: rgb(187, 167, 24);
}

h1 {
    color: black;
}

/* different background for a screen size larger 991. */
@media (min-width: 992px) {
    body {
        background-color: rgb(237, 75, 106);
    }

    h1 {
    color: orange;
}
}
Common breakpoints are:
Breakpoint |
Class infix |
Dimensions |
|---|---|---|
X-Small |
None |
<576px |
Small |
|
≥576px |
Medium |
|
≥768px |
Large |
|
≥992px |
Extra large |
|
≥1200px |
Extra extra large |
|
≥1400px |
It’s not necessary to define all of them, the less in use the easier it will be to maintain the code.
Inspector
Browsers have some developer tools included. For now we will look at the Inspector. Open the inspector of your browser through a right-click on an element of your page and choose “inspect”. (Or some similar command.)
Now you can inspect all specified attributes for each element. Furthermore, you can interactively change the values or even add new attributes or change the content of elements!
The changes you make are not saved to your source code of course, so you have to copy/ paste them into it, if you like your changes.
Code summary
Below is the explanatory code for an index.html and style.css file. (Your code can/ should be different of course.)
index.html
<!DOCTYPE html>
<html>
<head>
<title>Writing an own website</title>
<link rel="stylesheet" href="css/style.css">
</head>
<body>
<h1> <span class="www">w</span>riting<br>an o<span class="www">w</span>n<br> <span class="www">w</span>ebsite.</h1>
<h2>A flower needs some water</h2>
<p>Lorem ipsum dolor sit amet, consectetur adipisicing elit, sed do eiusmod tempor incididunt ut labore et dolore magna aliqua. Ut enim ad minim veniam, quis nostrud exercitation ullamco laboris nisi ut aliquip ex ea commodo consequat. Duis aute irure dolor in reprehenderit in voluptate velit esse cillum dolore eu fugiat nulla pariatur. Excepteur sint occaecat cupidatat non proident, sunt in culpa qui officia deserunt mollit anim id est laborum.</p>
<h2>A computer <i>needs</i> some code</h2>
<p>Lorem ipsum dolor sit amet, consectetur adipisicing elit, sed do eiusmod tempor incididunt ut labore et dolore magna aliqua. Ut enim ad minim veniam, quis nostrud exercitation ullamco laboris nisi ut aliquip ex ea commodo consequat. Duis aute irure dolor in reprehenderit in voluptate velit esse cillum dolore eu fugiat nulla pariatur. Excepteur sint occaecat cupidatat non proident, sunt in culpa qui officia deserunt mollit anim id est laborum.</p>
<br>
<a href="https://www.uni-weimar.de" target="_blank">Link to Bauhaus University</a>
<br>
<br>
<button id="info-button">info</button>
</body>
</html>
style.css
body {
    font-family: monospace;
    font-size: 16pt;
    background-color: salmon;
}

h1, h2 {
    color: orange;
}

h1 {
    font-size: 64pt;
}

h2 {
    font-size: 32pt;
}

p {
    background-color: teal;
    color: snow;
    text-align: justify;
    text-indent: 16pt;
}

a {
    color: black;
    background-color: hsla(50, 100%, 50%, 0.5);
}

.www {
    text-decoration: underline;
}

#info-button {
    text-transform: uppercase;
    text-shadow: 2px 2px 5px red;
    letter-spacing: 10px;
}